|
INFORMATION FOR THE: Invisible Landscape strategy - including diagrams Congratulations -- if you made it this far, you have learned to control your ship ** (or so you think -- get ready for the 2 invisible landscapes -- Positive Gravity and Reverse Gravity). After playing many, many games of Gravitar, I have figured out a pretty good strategy (which obviously works great, or I wouldn't be posting this information) to complete the upper left planet (the North West planet) in the 3rd Solar System / Invisible Landscapes. Of course the player still must have the control skills over the ship to make it through any planet no matter how good the advice is. Quick Advice: Invisible Landscape • BE PREPARED TO USE YOUR SHIELDS -- THIS IS A TOUGH PLANET. • Continuous shooting at the walls will help you know where you are in relation to the walls. • Get the fuel on the way, as you will need it -- but I say this -- Destroy the bunkers in the area, then get the fuel cell(s) in that area (they are landmarks -- without landmarks, floating around in darkness is extremely disorienting). • Always, Always, Always -- when you are about to pick up the fuel cells F1 and F2, travel just a bit past them to see the next fuel cell -- the visual landmark and the shooting into the walls will help you reach the next landmark. • Learning the layout of the landscape is critical to getting through the invisible landscape. (The terms bunker and gun turret are interchangeable in this discussion)
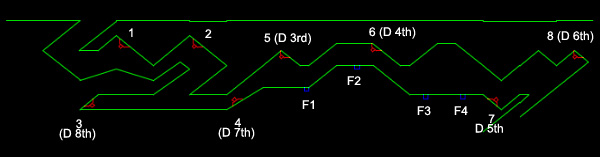
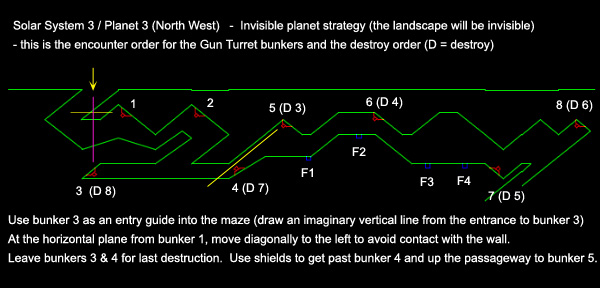
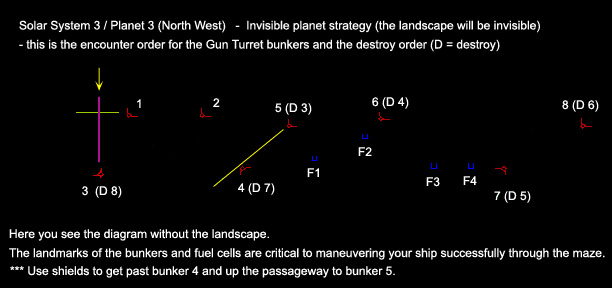
I've found a few keys to this North West planet - Invisible Landscapes are: **When you head for the entrance, make a bee line to it, as the 5th gun turret will still remain visible on the right edge of the screen -- this makes the trip up that diagonal part of the maze (towards the 5th turret) somewhat easier, as you are not floating around in total darkness. Finding the tunnel entrance is ONE MAJOR KEY to this planet - Draw an imaginary vertical line straight down to bunker #3 is THE KEY to finding the entrance • (if you destroy the 3rd gun turret you encounter it makes finding the entrance very difficult if you need to re-enter the tunnel - so my advice is to leave it to the end).
1st Gun Turret/Bunker Next, as you lower the ship down into the tunnel - draw an imaginary horizontal line to the 1st bunker - you had better maneuver the ship diagonally to the left a bit (before reaching this point) or you will collide into the wall - This will help you get into position to destroy bunker #1 2nd Gun turret/Bunker Getting into position to destroy bunker #2 is a bit of a challenge -- keep shooting towards the walls to maintain your relationship to the walls (I have hit the walls in that area more times than I can count). You may need to use the shield to successfully travel the passageway up to the bunker #2 area. Once bunker #2 is destroyed you need to travel into the area of bunker #3 & 4 -- again, keep shooting at the walls to maintain your relationship to the walls. Gun turrets #3 & 4 **Another KEY problem is making it up the passageway to the 5th gun turret if the 4th one is destroyed. So my new strategy (which worked perfect) for the positive gravity/invisible landscape is:
Leave gun turrets #3 & 4 (do not destroy them until they are last two turrets/bunkers - then make your way back in to the maze and then destroy them after the final turret #8) -- Use bunker #4 as the guide to bunker #5. You WILL need to use your shield TO GET PAST the 4th bunker, but leaving bunker 3 & 4 intact makes finding the passageway up to the 5th bunker much, much easier. (You may need to use the shield to successfully travel the passageway up to the bunker #5 area) Travel up the passageway to destroy bunker 5 (then destroy bunkers #6, 7, 8) Exit Strategy You can attempt to find your way out at the end of the tunnel (unlikely in the dark and I have done it only twice in the dark) You will probably run into the wall making the attempt -- when that happens, and your new ship appears at the top of the screen, make your way back into the tunnel (with the aid of bunker #3 as the guide post) and destroy bunker 3 & 4. Then let yourself collide into the wall and use another ship to make it out of the planet. Of course you will need to have enough ships to let several get destroyed on purpose (at the end of the maze near bunker #8 and after destroying bunker #3) After successfully destroying all the bunkers, you can attempt to find your way out of the planet's maze, (I have done it, and it is still difficult to do) but if you are low on fuel and can spare a ship, it's much easier to just collide into the wall and you will then be placed at the top of the screen to make an easy exit to the next solar system. Top |